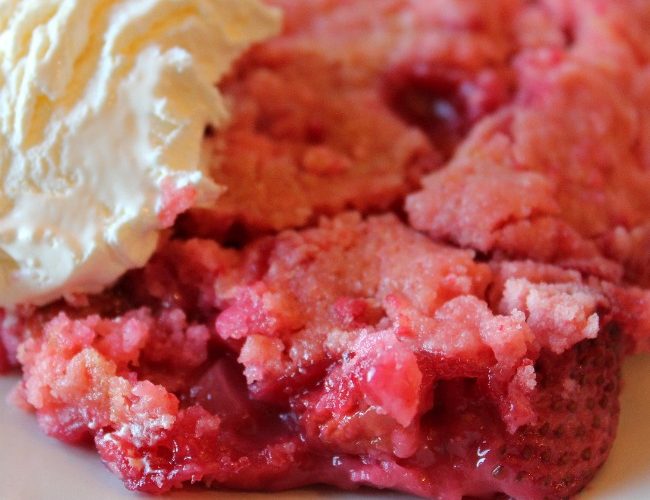
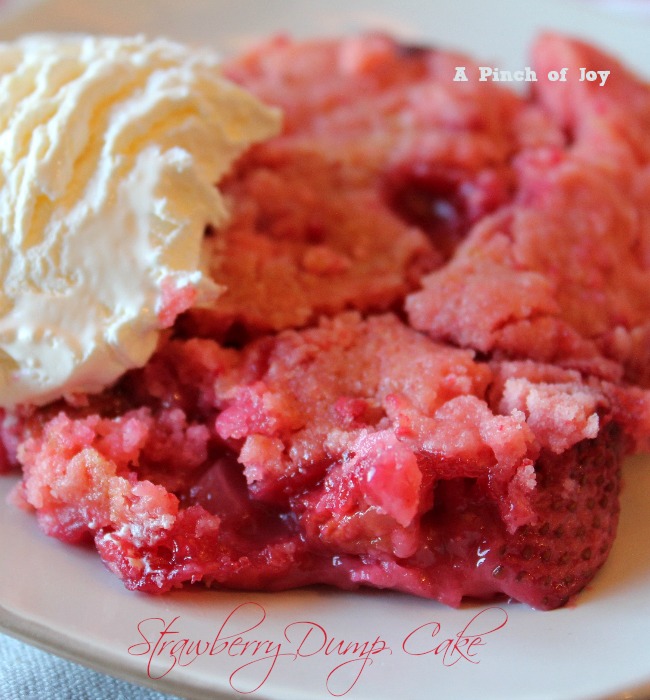
Lemon Blossoms

Lemon Blossoms - A Paula Deen recipe from A Pinch of Joy

This is one of the rare recipes I didn’t tweak the first time I made it.  After all, who is going to mess with Paula Dean??   Not this little chickadee!

I followed the recipe exactly.  She said it yielded 60 blossoms but I came up with exactly 48.  The yield may depend on the size of your tart/mini muffin pans.  I used a teaspoon to fill each cup half full so when the cake rise they don’t come over the top of the cup.  The batter is quite thick.  Be sure to generously spray the muffin tins.  Or you could find yourself washing stuck on muffins out of them so you can do the next batch – just sayin’.  Of course if you own pans that will let you make four dozen at once, just disregard – or better not.  Everything comes out better with generosity.

One batch was cool when I dipped it into the glaze (thanks insurance company for your fourth call on the same issue.  Please look at all the records before you call!  Whew – all better now.).  The second batch was right out of the oven – didn’t seem to make a difference.  Or at least not as much as I expected because I thought the warm cakes would absorb more glaze.  I tried several different way of glazing.  The one that worked best for me was to put the cake in the bowl of glaze and spoon the glaze over it, then transfer to a fork in my left hand.  I held the dripping cake over the broad bowl of glaze while I put in a second cake and repeated the process with my right hand.  When the second cake was glazed, the left hand cake had stopped dripping and I transferred it to the rack with the finger of my right hand.  Put the second cake on the fork and continue with the process until all were done.  I ended up with about a fourth cup of glaze (probably for the last dozen I didn’t have) left over so I drizzled it over the top of all the cakes.

A lemony treat just the right size to satisfy your sweet tooth. Perfect for a tea party, buffet table . . .  or Easter dinner.

Lemon Blossoms

Cook Time: 12 minutes

Yield: 60

Serving Size: 1 Two-Bite size cakelet

Lemon Blossoms

Ingredients

  • 1yellow cake mix, 18.25 oz
  • 1 instant lemon flavored pudding mix, 3.4 oz.
  • 4 large eggs
  • 3/4 cup vegetable oil
  • Glaze
  • 4 cups confectioners' sugar
  • 1 tablespoon lemon zest (1 lemon)
  • 1/3 cup fresh lemon juice
  • 3 tablespoons water
  • 3 tablespoons vegetable oil

Instructions

  1. Preheat oven to 350 degrees.
  2. Spray miniature muffin or tart pans with nonstick cooking spray.
  3. In a large bowl, combine cake mix, pudding mix, eggs, and 3/4 cup oil and beat for 2 minutes. Batter will be very thick.
  4. Spoon batter into each muffin cup using a teaspoon to fill them no more than half full.
  5. Bake for 12 minutes until just turning golden. Turn cakes out of the pan while warm.
  6. Glaze
  7. In a medium bowl, sift confectioners' sugar.
  8. Add lemon zest, lemon juice, oil, and water, stirring until smooth.
  9. Dip the cakes into the glaze while warm, taking care to thoroughly cover each cake.
  10. Place the cakes on a wire rack with wax paper underneath to catch the drips.
  11. Let glaze set firmly before storing in an airtight container.
http://www.apinchofjoy.com/2013/02/lemon-blossoms/

To save this recipe to your ZipList Recipe Box, click the blue button.  To find out more about ZipList, click here.

Don’t miss a thing —click the buttons on the header to subscribe by email or RSS feed, follow on facebook or twitter to catch the latest post!  Share with others by  giving this post a Stumble, Tweet, Pin, or Facebook Like by clicking the buttons on the bottom of this post.  Your support of A Pinch of Joy is  appreciated!


Linking up to these awesome parties here [Read more...]

Related posts:

Spiced Pineapple Carrot Cake

Spiced Carrot Cake made with pineapple and coconut

Carrots are popular at our house.  A one pound bag lasts about one meal – and that’s for three people!  I had to work fast after my grocery buying trip to have enough to make carrot cake.  And it was so worth it!  Carrot cake is good.  Spiced carrot pineapple coconut cake with nuts and raisins is celestial!

Carrots have been used in desserts since the Middle Ages because they are somewhat sweet by themselves.  They were plentiful and easy to obtain and much less costly than sweetener imported from distant lands.  The Scandanavians are credited with the carrot cake, while Britons made carrot pudding popular in the 1700s.  English colonists brought carrots to the New World where they were eaten as a side dish.  Carrot cake didn’t turn up in American recipes until 1913.   It wasn’t until the early Sixties that carrot cake and cream cheese frosting were wed.  In 2005, carrot cake was declared among the top five favorite American desserts.  One taste of this and you’ll see why!

This looks like a long recipe, but it really goes together quickly. Do take the time to measure the dry ingredients and mix them together before adding to the other ingredients.  The mixing time with the wet ingredients is so short that it’s possible the flavors wouldn’t mix or you could end up with too much soda in a bite.  Use flaked coconut as it really adds to the finished texture and flavor.  Be sure to peel carrots before grating.  Or, do like I did, grab a bag of baby carrots already peeled and put them through the food processor.  You’ll want small pieces so stand the carrots up in the hopper so that the small diameter is cut instead of the longer length of the carrot. Or run the longer shreds through twice.  Pecans can be substituted for the English walnuts.

The cream cheese frosting is not a sweet frosting and is a perfect complement to the dense cake.  Beat it a little longer than most frosting to incorporate air into the mix and make it light.  You can add up to one more cup of confectioner’s sugar to the mix, if you want a sweeter, more firm frosting.  The recipe also doubles nicely if you decide to layer the carrot cake or make cupcakes.

This is THE best carrot cake ever.

Spiced Carrot Pineapple Cake

Spiced Carrot Pineapple Cake

Ingredients

    Cake batter
  • 2 cups flour
  • 1 ½ cup sugar
  • ¼ cup brown sugar, packed
  • 1 ½ teaspoons baking soda
  • 1 teaspoon salt
  • 4 teaspoons cinnamon
  • ¼ teaspoon nutmeg
  • ¼ teaspoon ground cloves
  • ¼ teaspoon ground ginger
  • 2 cup grated and peeled carrots, packed
  • 1 cup sweetened coconut flakes
  • ½ cup golden raisins, optional
  • 1 can 8 oz crushed pineapple, drained
  • 1 Tablespoon of pineapple juice, from above
  • 1 ½ cup of English walnuts
  • 1 cup cooking oil
  • 2 teaspoons vanilla extract
  • 3 eggs
  • Cream Cheese Frosting
  • ¼ cup butter
  • 1 8oz package of cream cheese
  • 1 cup powdered sugar
  • 4 teaspoons vanilla extract
  • Tiny pinch of salt

Instructions

    Cake
  1. Peel and grate carrots. I use a bag of baby carrots and run them through the food processor.
  2. Measure all dry ingredients into large bowl and whisk together.
  3. In mixing bowl, mix together carrots, drained pineapple, raisins, coconut flakes and walnuts.
  4. Add oil, vanilla and reserved pineapple juice.
  5. Add eggs one at a time, mixing well between each one.
  6. Slowly add dry ingredients and mix until well mixed about one minute. Do not overmix.
  7. Spray 9x13 pan with cooking spray and pour batter evenly into pan.
  8. Bake at 350 degrees for 40-45 minutes until toothpick inserted in center comes out clean.
  9. Allow to cool thoroughly before cutting or icing.
  10. Cream Cheese Frosting
  11. Soften butter and cream cheese at room temperature.
  12. Cream butter until light about 2 minutes.
  13. Add cream cheese and cream with butter for additional 2 minutes.
  14. Slowly add powdered sugar, salt and vanilla. Mix well.
  15. If desired, you can add up to one more cup of powdered sugar to your desired sweetness and firmness.
  16. Keep at room temperature for ease in icing, but refrigerate any leftovers.
http://www.apinchofjoy.com/2012/07/spiced-carrot-pineapple-cake/

Don’t miss a thing!  Follow along by email, RSS, twitter or facebook!    If you found this post helpful, I would love it if you gave it a Stumble, Tweet, Pin, or Facebook Like. Your support of A Pinch of Joy is greatly appreciated!


Linking up to these awesome parties here and [Read more...]

Related posts:

Buttercream Cake Icing and writing Joy

Cake with Tiffany Blue frosting, flowers and word Joy

Sunday was my final exam in the cake decorating class I’ve been taking.  We were to bake two layers, stack and frost them before class.  We could make flowers ahead of time and let them dry.  In class we had to write a word and do the border, then complete the cake.  I knew right away I wanted Tiffany blue as the base with white decorations. We hadn’t had instructions on how to make the flowers I wanted to use, but I read the book and watched a couple of videos.  And created them anyway!

The meringue powder in the recipe helps the frosting form a firm crust that allows decorations to hold their shape.  Still the larger flowers, the teacher said, would need about three days to dry enough to completely hold their shape while being set on the cake and transported.    Meringue powder also allows the cake icing to crust just enough, creating a firmer base on which to build the decorations.  I wanted to allow enough time for that to happen before class.

I baked the cake Saturday.  After it cooled, I leveled the layers by cutting off the rounded tops.  A layer of frosting on the bottom one and I set the top one in place upside down.  This let the 90 degree edge created by the cake pan form the top edge of the cake.  Then I frosted with a “crumb coat” of icing – just enough to keep crumbs from breaking loose and ruining the look of the icing.  (And, lesson learned, I didn’t bake a chocolate cake this time!) After several hours, I went back and gave the cake a thin coat of the Tiffany blue, partly to create a smooth base for the last layer and partly to “practice” the icing techniques. (I made an entire recipe of  Tiffany blue to do the cake as teacher warned it is impossible to match the new batch to the old, should you run out!)  Sunday morning, I put on the last layer of icing.  I remember it turned out gorgeous, smooth with a sharp edge at the top.  And then I reached up for something and bumped the cake,  lifting off a four inch strip of frosting – and cake!- all along one edge.

There went perfection – as I choose to remember anyway!  Nothing to do but try to patch it back together.  Remember that waxed paper trick I talked about here?  It works quite nicely.  Amazingly well, in fact considering the gash that needed repair.  :-)

In class, we first had a lesson in  ribbon roses and writing. Writing was by far the hardest thing ever!  Teacher had me thin my icing – twice – which really helped.  But my lines still curlicued, broke, twisted and refused to go where my brain shouted directions!  And I was only doing a three letter word!  After picking letters off several times with a toothpick (yes, you can do that!), the last two finally came out okay.  The “J”  I finally let dry for a few minutes and then I shoved it into its real shape with a toothpick.

I have profound respect for Niece who was a cake decorator in a store bakery!!!!  And for sisters in law ElA and JanE who have actually made wedding and other celebration cakes (plural) for other people!  Excuse me.  I have some  a lot  of practice to do!!!

Wilton Buttercream Cake Icing

Wilton Buttercream Cake Icing

Ingredients

  • 1 cup solid white vegetable shortening
  • 1 teaspoon flavoring (vanilla, almond or butter)
  • 7-8 teaspoons milk or water
  • 1 pound confectioners’ sugar
  • 1 tablespoon Wilton Meringue powder
  • For chocolate, add
  • ¾ cup cocoa OR 3 1 oz unsweetened chocolate squares, melted
  • 1 - 2 teaspoons water or milk

Instructions

  1. Cream shortening, flavoring and water/milk until well mixed.
  2. Add confectioner’s sugar and meringue powder and mix at low speed until well mixed.
  3. Blend for an additional minute until creamy.
  4. Makes 2 ½ cups stiff consistency frosting. (See Notes below.)
  5. Keeps a week in the refrigerator and freezes well.
  6. Notes:
  7. _Stiff consistency is used for decorations that will be upright, like roses.
  8. Medium consistency is used for stars, borders, and flat petalled flowers. Add 1 tsp of water or milk per cup of stiff icing.
  9. Thin consistency is used for icing, writing and making leaves. Add 2 tsp water or milk per cup of stiff icing. For writing, Wilton recommends that you also add ½ teaspoon of piping gel per cup of thin icing, to help the icing “stretch” and not break as you write.
  10. Frosted cakes will stay fresh in freezer up to six months. Defrost a frozen cake unwrapped to prevent condensation forming on the frosting and ruining it.
  11. This recipe and directions are from Wilton Cake Decorating instruction manuals. For more information, visit their website. _
http://www.apinchofjoy.com/2012/05/buttercream-cake-icing/

If you enjoyed this recipe, please pin it using the button at top or share with one of the buttons below.  You can subscribe by email or RSS feed, follow on facebook or twitter so you don’t miss a thing.  I’d love to have your company on this venture!


Linking up to these awesome parties here and   [Read more...]

Related posts:

Hot Fudge Sundae Cake

Hot Fudge Sundae Cake - A Pinch of CakeApple Valley Sue sent this recipe saying “This is the best recipe.  You can make it in 10 minutes.  Put it in the oven right when you start the meal and you have a hot, delicious dessert.”  I did and it was!  Thank you for sharing!

Being curious and of questioning mind, I actually made this several different ways.  Maybe the second time was because the first time my curious mind did not register the correct size of pan – which Sue clearly stated in her email.  Be sure to use a square 9 x 9 pan.  Just sayin’.  The recipe as written will turn out fudgy, sundae saucy and yummy!

I really was curious as to how this could make the fudge sauce under the brownie.  The secret is the sugar.  Sugar is not just a sweetener.  It is a hardworking part of the complex reactions that take place in baked goods.  In this recipe, sugar’s primary role is to attract moisture.  The brown sugar on top attracts even more moisture than white sugar, besides giving a more robust flavor.  As the saucy cake bakes the layers begin to build, with the heavier moisture laden sauce layer collecting on the bottom of the pan and the lighter cake layer coming together on top.   Just to see what happened, I made it again and reduced the amount of sugar in each layer by one quarter cup and was rewarded with pudding on the bottom instead of sauce.  Good, but no comparison to the original.

Sue says to let the cake cool for 15 minutes, then cut the cake into squares.  Serve warm with  ice cream, topped with the sauce scooped from the bottom of the pan.  Enjoy!

This recipe was featured at Miz Helen’s Country Cottage, RoCa and Company,     Thank you!


Hot Fudge Sundae Saucy Cake

Hot Fudge Sundae Saucy Cake

Ingredients

    Mix together in 9 x 9 square pan, greased
  • 1 cup flour
  • ¾ cup white sugar OR Splenda for Baking
  • 3 Tablespoons of cocoa
  • 2 teaspoons baking powder
  • ½ teaspoon salt
  • Mix together in measuring cup, then pour over dry ingredients and mix well.
  • ½ cup milk
  • 2 Tablespoons canola oil
  • 1 teaspoon vanilla
  • Mix together and shake evenly over the cake
  • 1 cup brown sugar (packed)
  • ¼ cup cocoa
  • Pour evenly over the entire cake and topping. DO NOT MIX!
  • 1 ¾ cup hot water

Instructions

  1. Preheat oven to 350 degrees, while following directions above
  2. Bake 40 minutes
  3. Let cool 15 minutes
  4. Cut into squares and invert each on to plate.
  5. Serve with ice cream topped with the sauce scooped from the bottom of the pan.
  6. Nine servings.
http://www.apinchofjoy.com/2011/10/hot-fudge-sundae-saucy-cake/

Don’t miss a thing!  Follow along by email, RSS, twitter or facebook!    If you found this post helpful, I would love it if you gave it a Stumble, Tweet, Pin, or Facebook Like. Your support of A Pinch of Joy is greatly appreciated!


~~~~~~~~~~~~~~~~~~~~~~~~~~~~~~~~~~~~~~~~~~~~~~~~~~~~~~~~~~~~~~~~~~~~~~~~~~~~~~~~~~~~~~~~~~~~~~~~~~~~~~~~~~~~~~~~~~~~~~~~~~~~~

Linked to: Taking A Timeout Thursday, Mouth Watering Monday, Joy of Desserts, Sumos Sweet Stuff,  Tasty Tuesday , Delicious DishesTea Party Tuesday, Crazy Sweet Tuesday, Totally Tasty Tuesday , Cast Party Wednesday , This Chick Cooks , Full Plate Thursday , Show Off Your Stuff, Hookin’ Up, Simply Link Party Making It with Allie, It’s A Keeper Thursday,  Strut Your Stuff Saturday, It’s A Rockin’ Party, Sweet Tooth Friday,


Related posts: