
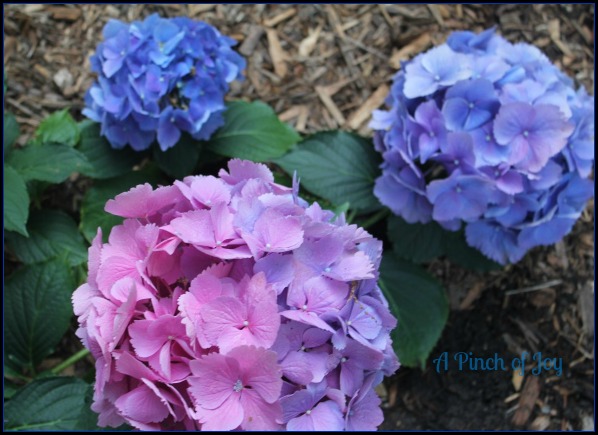
Who doesn’t love hydrangeas? We have a shady corner crying out for color and light. The shrubs we had planted there never thrived because it was too shady. Then the local power company came in to do some work on the transformer the shrubs were hiding. No chance of thriving after that. I was thrilled to discover that hydrangeas do well with morning sun and afternoon to evening shade. Just exactly the conditions we have. And clay soil is not a problem either, as hydrangeas will handle that issue with the proper soil amendments. When I saw these beautiful hydrangeas with blue and pink and purple blooms on the same plant for a great price, that was the seal on the deal! I took six of those elegant ladies home with me.
If you are putting money into gorgeous nice sized plants, you want them to give them the best environment to do well. Kind of like having kids 🙂 Here’s five tips for planting hydrangeas.
1. Be sure to leave enough space between plants. Check the information tag that comes with your plants and follow the recommendations. Hydrangeas are not easily pruned to a smaller size than what is already determined by their genetics. Set plants out away from fences or walls at least half the diameter of the mature plants. My hydrangeas will grow 4 foot tall and 4 foot in diameter. I want the plants to form a loose hedge, so I planted them on four foot centers.
2. Give the roots room to grow. Dig a hole as deep as the pot and at least twice as wide. If your soil is clay like mine, dig a little deeper to move out the clay (and here, shale). Then add back in amended soil so that the top of the root ball is even with the top of the ground. Remove the plant from the pot and free some of the roots by running your (gloved) hand around the root ball. Place the plant in the hole.
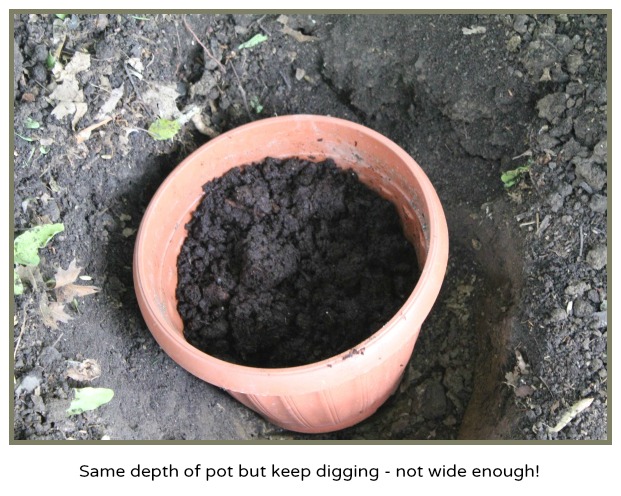
3. Surround with good soil. If your soil is good loam, it will be mostly sand and silt with a bit of clay. It will crumble in your hand. Lucky you! You get to go ahead and pat that good soil around the plant.
However, clay soil is thick, gummy and clumps easily without crumbling. When dry, it is literally brick. It needs to be amended with compost or peat moss and sand. Some areas in our garden have such bad clay and shale that we can only remove the sticky clumps and replace. I use a proportion of roughly 3 to 2. Three measures (hands full or buckets full) of soil and one measure of peat (or compost or composted manure) and one measure of sand. You might find other proportions work better in your soil. Also break down the clay walls of the hole with a hand fork so the roots can penetrate. It’s hard work to plant in clay, but as you continue to garden the soil WILL improve!
4. Water thoroughly and deep. If soil is very dry, give your hydrangea its first drink just after you place it in its new home. Add about 1/3 of the surrounding soil, fill the hole with water and let it drain. (This also removes any air pockets in the soil you just added, especially important if you are dealing with a large plant.) Then add the rest of the soil and pat firmly into place. For the first two years and in drought, keep the plant well watered. I’ve noticed the other hydrangeas in our garden will wilt and look terrible on a hot afternoon, but they will perk up after it cools down. Keep that factor in mind, because in clay soils it is possible to over water since the clay soil doesn’t drain well.
5. Mulch well. Choose a mulch that will eventually break down and add to the organic material in the soil. Try to maintain the mulch depth at about 3 inches to conserve moisture and regulate soil temperature. Keep the mulch away from the base of the plant by about four inches to maintain airflow and prevent rot.
Be sure to follow A Pinch of Joy so you don’t miss a thing!
Subscribe by email on the sidebar or follow on Facebook, RSS feed, bloglovin’ or twitter using the links here or the blue buttons on the header! Follow my pinterest boards here.
If you found this helpful, please share on your favorite network by clicking one of the buttons on the bottom of this post.
I’m so glad you stopped by today!
Linking up to these awesome parties here
Discover more from A Pinch of Joy
Subscribe to get the latest posts sent to your email.

 Welcome! I’m Charlene. I love to share quick and easy recipes, whatever I’ve learned in our last DIY project – anything that helps make life easier, better and more fun!! I hope you will find inspiration and add a pinch of joy to your day!
Meredith @ A TIPical Day says
Hi Charlene,
I found you at Serendipity and Spice: Manic Monday. I just love the colors in these blooms! I don’t think I have ever seen ones that had multi-colors like that before! Just lovely. Great planting tips too! 🙂
Meredith @ A TIPical Day recently posted…Visiting Colonial Williamsburg with Kids
Christal Lyn says
I kid you not, this post is right on time! I found you through the link party and I’m so glad I did! I have this gorgeous light pink hydrangeas in my yard and I really want more of them but the ones I usually find are purple, do you have any tips for propagating ( I think that’s the word, I’m new to gardening)?
Charlene says
I’ve never tried to propagate hydrangeas. I think it would be possible though. I understand the color depends on acidity and you can change the colors of the flowers by adding certain chemicals to the soil around the plant. I’ve not done that either — though I might try when I see what color the newly planted hydrangeas turn out next year! Good luck with your gardening!
Charlene recently posted…Busy Monday #65