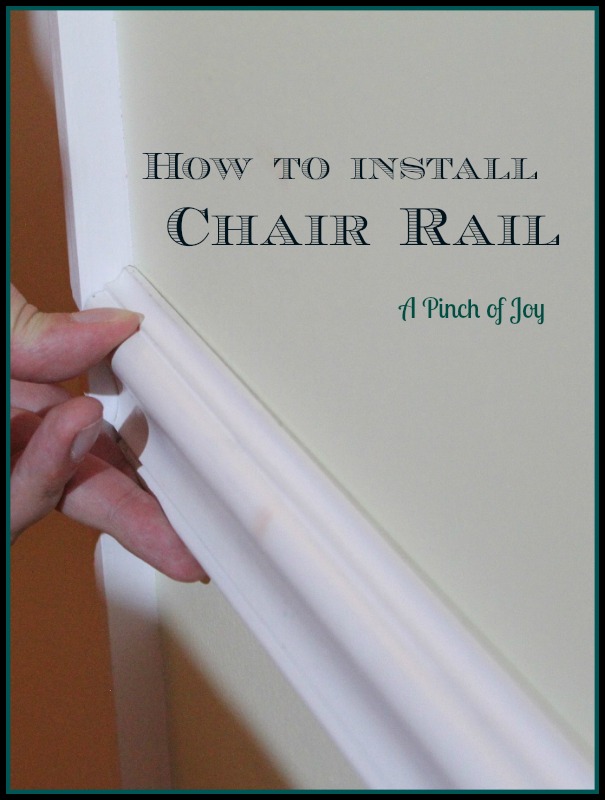
Installing a chair rail was a step in giving our boxy plain dining room some architectural character. Here’s what we did:
You can purchase 12, 10 or 8 foot lengths of moulding and trim. Before buying, measure the room and take note of windows and doors. Determine the longest unbroken run and that will determine the length of the stock moulding. For example, if the measurement is over 10 foot, buy 12 foot long stock. This will allow you to make as few splices as possible and save you time and work. With a little thought, you can figure out how to make those three dimensions work in your room to make as few cuts as possible. Just be sure the pattern is exactly the same in all lengths. Remember when figuring length of stock that straight ends will butt up against door and window frames but that corners will require an extra inch at least in order to make the diagonal cuts necessary for fit. (And don’t worry if you come out with a bit of extra footage — that’s your insurance policy against mistakes!)
All the woodwork in our home has been painted white, so when we purchase new trim or molding I go for the preprimed stock. I also give it at least one coat of the finish paint before doing anything else with it. It’s much easier to paint when it is laying flat and no worries about getting paint on a wall.
Once you’ve determined the height of your chair rail, and are ready to install, grab your tape measure and level to make a level line along the whole length of the room. Floors are not always level, so measuring up from the floor could give you a wavy line. It might be parallel to the floor but make you seasick to look at it!
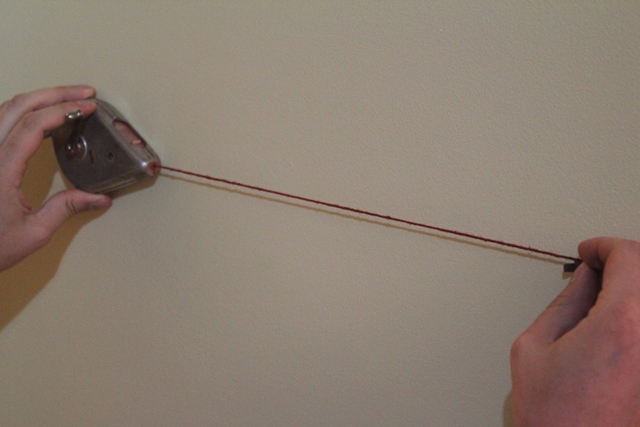
A quick way to make a line is to measure up from the floor at two points and have a helper hold one end of a chalk line while you draw the line taut, hold it securely in place and snap the line. Check the level of the line it’s full length with a carpenter’s level. Adjust as needed to make sure the finished line is level all the way round the room. A good laser level (the kind that comes with it’s own tripod) can be helpful, especially if you working solo. In that case, get the beam set across the entire wall and check the measurements from the floor at several places to make sure the rail will be installed where you expect it to be.
In new construction, workers will often cut all the moulding before installation. Our experience in older homes is whatever the project, it is better to cut as you go. That way it’s easy to make minor adjustments and to custom cut each piece so it fits perfectly – or at least as close to perfect as it can get. One wall in our dining room has a very noticeable bow. You can actually measure where it dips in a full ¾ of an inch! .
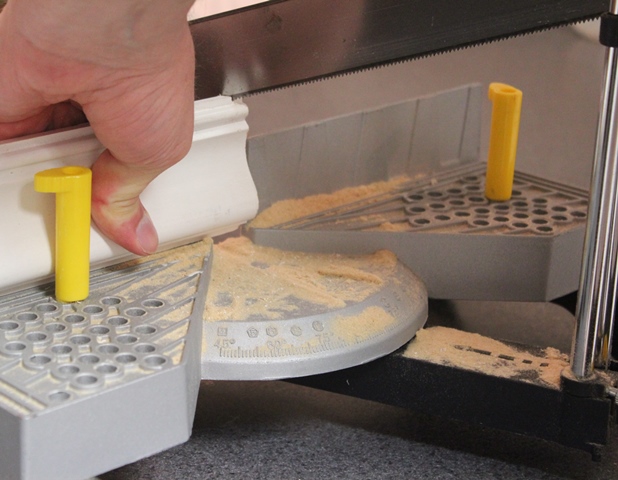
The cutting and installation was Bytes’ contribution. I’m on the other end of the tape measure, holding long boards when they are being sawed and acting as general picker upper and gofer. (Wheels’ long work hours keeps him in an advisory position 🙂 ) The dining room was our first trim project in this house. We weren’t sure how it would work out or if we would want to do another one again. Minimal investment was to find the hand miter saw in the garage so Bytes did all the work in by hand. It was a little more time consuming but not hard to do.
Begin installing at an inside corner . Measure from the corner to the next natural stopping place. That may be a door, a window or the next corner. Doors or windows generally call for a straight cut on your moulding. Inside corner cuts are done at a 45 degree angle with the part of the moulding that goes against the wall the longest part of the angle. We call those “innies” because the cut goes in towards the wall with the longest part next to the wall. Both pieces of moulding are cut the same at the corner. They will butt up against each other and make a square corner.
An outside corner is cut with the longest part of the moulding on the outside and the short cut right on the corner of the wall. Those are “outies” If it is necessary to splice two pieces of moulding, make 30 degree cuts. One piece will be an innie and on the second piece the cut will be an outie. It doesn’t matter which is which as long as you are consistent in the way you cut the splices thoughout the room.
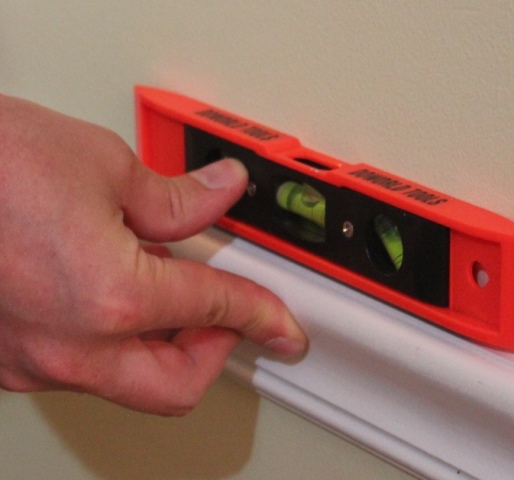
To install, put the bottom (or top if that’s the way you measured — no right or wrong way) of the molding on the level line that you drew. Check to make sure the moulding is level before beginning nailing. Use a 2 /12 inch finishing nail at the high parts of the molding to prevent splitting. If the chair molding is narrow, one nail every 12-18 inches, depending on the placement of the wall studs, will suffice. Wider molding may need a nail at the top and another at the bottom directly below the first. We did it the classic way with a hand held hammer!
Use glue ONLY when joining one piece of trim to another, if then. We didn’t. It is not be necessary to glue the trim to the wall because the nails will hold it securely. In fact, if you (or the next owner) want to remove the trim at some point, glue will turn that job into a very expensive and time consuming mess. Removing something glued to wall board generally destroys the top layer at a minimum, requiring patching, and can ruin the board to the point that it must be replaced entirely.
Use a nail set to recess the nail heads just below the surface of the wood.
This is where I begin to prepare the trim for painting. Fill the nail holes with paintable caulk or joint compound. Apply a bead of paintable caulk to the edge of the molding where it meets the wall, and fill in any other holes or gaps if needed. Paintable caulk is what we used in the dining room. Test its paintability in a corner before doing the whole room if you haven’t used that particular brand or kind before, because results can vary. You can also use joint compound to fill in openings and cracks. Use either one sparingly. A wet rag or sponge to wipe up excess with both is very helpful.
Sand smooth when dry. I picked up a set of small scale power tools at a garage sale a couple of years ago. The contractor selling them considered them a joke gift he couldn’t wait to get out of his sight. Well, I looove them!!! They are all lightweight, which is a big consideration for me. The detail sander with its 3 inch triangular head is just the perfect size to make sure the places that were filled are smooth and as invisible as possible.
To finish the project, apply your choice of paint to the chair rail to give it a clean, finished look.
Follow A Pinch of Joy so you don’t miss a thing! Subscribe by email or RSS, follow on facebook or twitter! If you found this helpful, please share on your favorite network by clicking one of the buttons on the bottom of this post
Discover more from A Pinch of Joy
Subscribe to get the latest posts sent to your email.

 Welcome! I’m Charlene. I love to share quick and easy recipes, whatever I’ve learned in our last DIY project – anything that helps make life easier, better and more fun!! I hope you will find inspiration and add a pinch of joy to your day!
Carrie @ My Favorite Finds says
I love chair rail! It really makes a room so pretty. Thanks for sharing at Pinworthy Projects.
Carrie @ My Favorite Finds recently posted…Five Tips for Gardening with Kids
Yvonne @ Dress This Nest says
Such a great value project. And so simple, as you have shown here.
Linda@With A Blast says
Good to know, Charlene! Thank you for sharing at our ALL MY BLOGGY FRIENDS party 🙂
Linda@With A Blast recently posted…All My Bloggy Friends – Special Mother’s Day Features
Mel says
Very informative it always looks so beautiful
Mel recently posted…Wet Your Pants Wednesday – Mothers Day