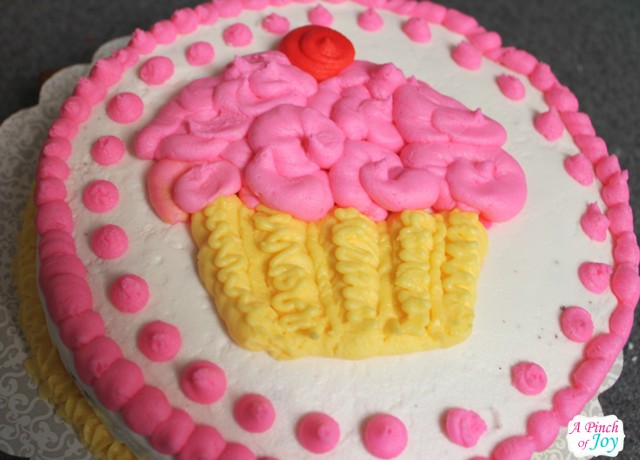
I’m taking a cake decorating class. If you’ve been to a Wilton class you’ll recognize this as lesson 2 in the beginner’s series. You can tell I need a little practice with smooth starts and stops. Maybe some practice with making smooth, even movements in making the edging. And my dots look more like pink chocolate chips — just can’t quite get that “stop squeezing the frosting bag and move to the side smoothly” step.
See those freckles over there on the right? Teacher told us not to bring a chocolate cake – but guess what flavor of low sugar cake mix I had on hand at midnight? Not that low sugar matters with all that frosting, but it was also the only one I had.
I did pretty well with the make this “one layer a torte” step as we started. Teacher handed me a coping saw thingy and said cut the round top off and make two layers out of this. That I did well. After that, between the chocolate cake that literally spat crumbs through the frosting and the frosting that wouldn’t come close to medium thin on the viscosity scale no matter how many delicate measures of water I stirred in — let’s just say things were on a decidedly downhill slope.
By the end of the class, teacher came over and gave me high (albeit a little faint) praise. That looks really good, she said, I didn’t think it would turn out that well when you first started. Now really!!! Made me laugh!
I do have high hopes for one step though — and it may be the most useful thing I learned. After you’ve frosted your cake with a butter cream type frosting, let it set about an hour until it becomes “crusted” or forms a skin that is some what firm. Then tear off a piece of waxed paper about the size of the cake. Lay it on the cake. Then gently run your hand all over the top of the cake. The heat from your hand and a bit of gentle pressure will smooth the frosting beautifully. Fold the waxed paper in half and repeat around the sides of the cake. Viola! A beautifully smooth layer of frosting just begging for decorations. You can still see a few craters in the frosting above — but I think with a little practice I can actually master this and do it really well.
I may use decorations out of the bottle — you know, sprinkly things — on my smooth frosting. But I still have two more lessons so maybe there will be something magic I have yet to learn. And I do have white cake mix on my shopping list so that ought to help some.
In the meantime, that other layer of chocolate cake I baked before class gets served with a dollop of whipped topping. Less labor intensive and 1 carb per dollop.
Here’s to smooth tops!
Discover more from A Pinch of Joy
Subscribe to get the latest posts sent to your email.


 Welcome! I’m Charlene. I love to share quick and easy recipes, whatever I’ve learned in our last DIY project – anything that helps make life easier, better and more fun!! I hope you will find inspiration and add a pinch of joy to your day!
Georgia says
I’m glad your instructor told you to wait an hour for the icing to crust. Most every one tells you in 15 or 20 minutes. I have never had a cake crust in 15 or 20 minutes and felt surely I’ve been doing something wrong. Funny how those little comments that you think don’t matter actually help someone.
Charlene says
Thanks for taking the time to comment! Glad you found something helpful — and you are right. I thought I was offering a tip on using waxed paper to smooth the top and you found something else entirely to be more pertinent. Gotta love those serendipitous moments!
JD says
Oh my, if I could make a cake that looked that beautiful I would be thrilled. Yours looks great! Trust me….great. PS If you don’t want it I will take it. Grin
sharon says
I think the cake looks great! Learning how to decorate a cake is on my wish list of things to do. Thanks for sharing the tips you learned.
Sharon @ mrs. hines class
Charlene says
It is fun — you’ll enjoy it if you get the chance to take a class! Just hope you are better prepared than I with anything but a chocolate cake. That was my biggest problem — it was pretty funny, I’m sure, watching me trying to hide all those chocolate freckles!