
The first house we owned was a three story Victorian. The second and current house is a two story Seventies Special. What do they have in common? Wallpaper. Although wallpaper is a trend that comes and goes, it is still a classic solution for rough walls or providing an accent. What goes up, must eventually come down. Here’s what I’ve learned about how to remove wall paper:
1) The Victorian had plastered walls. First narrow wood strips called lathe was nailed to the stud, a rough coat of plaster was then applied. When it dried, a finish coat of plaster was laid over the top and polished smooth by a skilled craftsman. Properly applied and maintained, it produced a durable surface. To remove wallpaper we found hot water and a clean garden sprayer were most effective. Working in four foot squares, Wheels would saturate a section, going over it until it was wet and almost dripping. Then he would move to the next section and begin to saturate it.
After about five minutes I would begin to test the first section, using a putty knife to see if I could separate the paper from the plaster wall. Let it set too long and you could damage the plaster so focus and repeated testing was key. When wallpaper paste softened sufficiently, paper would peel easily away without damaging the plaster. Often the paper would come off in big chunks and all that was necessary was to wash the glue off the plaster and wipe it dry. We could do a wall in an evening and were confident in our ability.
Then we moved and our experience grew in depth and breadth.
2) We prepared for the project the same way. Remove furniture from the work area. Shove it to the other side of the room, in other words. And put down drop cloths. Remove electrical faceplates. We acquired a little gadget that looks like a mouse only with spiky gears on the bottom instead of the roller ball. The spikes of the scorer pierce the wallpaper so liquid can penetrate and soften the adhesive. These are all good things.
3) Successful wallpaper removal depends on something over which you may have no control, especially if you are not the first owner. Primed wallboard. If you find yourself trying to remove paper from unprimed wallboard –it can be done (see #4) but you have my sincerest sympathy! Best is preventive. Never, ever, ever put wallpaper on wallboard that has not been primed and/or painted.
4) Strippable paper only means that the top layer can be pulled off. You will still be left with a layer stuck to your wall. It was a snow day and nothing was moving when we decided to work on the powder room. The wallpaper also was not moving, so we filled all the pans we could find with boiling water and put them in the closed room. Bytes dived in with a putty knife when visibility had been reduced to zero by steam and began scraping. It worked.
5) Not all adhesives are created equal. Our next project was the kitchen soffit — 20 feet in length 12 inches wide. That paper came off inch by painful inch over many long days. It was probably made by Wall Armor. We tried every trick we knew or ever heard about, then Bytes googled for more. But lessons learned:
6) There are many options for a solution that will soften adhesive. Fabric softener is one. Mix equal parts of fabric softener and very hot water in a spray bottle. Vinegar and very hot water in equal measurements mix in a spray bottle is a second option. For these solutions, spray about a four foot square and let it set for five minutes before scraping it off. These may or may not work on a particular adhesive, but you won’t know until you try. Another option is a commercially prepared adhesive softener. There are several different brands. Follow the directions on the label. These, also, may or may not work.
7) Listen to the crew. That below-the-chair-rail-paper in the dining room was also made by Wall Armor. And stuck down with NASA rocket glue. Bytes and Wheels were not swayed by my “I don’t want to spend money on equipment that will just set in the garage forever between uses” argument. One hour and two feet of semi-cleaned wall and they were off to the home improvement store. And they came home with a wallpaper steamer.
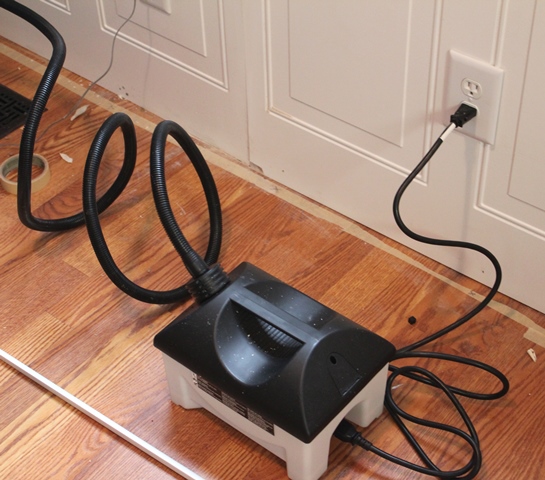
8) The right equipment makes the job so much easier! This little $50 wonder made the dining room project so much easier. We turned around and used it again a few months later in the office makeover. It uses all the most successful factors from all the other methods we’ve used –strip the top layer of paper off, score the remaining layer, apply steam in a controlled area to quickly soften the adhesive without damaging the wall underneath. If you do run into a tough patch, the adhesive softeners give the boost needed to get the paper off. The wallpaper steamer has saved so many hours, so much frustration and effort!
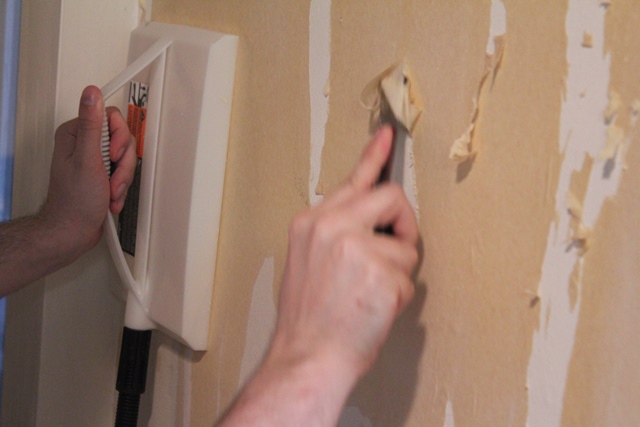 Add water to the steam unit. Steam moves up the hose to the applicator (on the left). Place the applicator over the wallpaper to be removed and hold it in place until the adhesive loosens. Scrape off the paper and adhesive (on the right). Repeat until done. Wash wall with sponge and warm water. Ready for a new look!
You might also like How to Hang a Wall Cabinet the Easy Way, How to Change Your Light Fixture in 7 Easy Steps, How to Install a Chair Rail
I am so glad you stopped by! If you found this helpful, please share on your favorite network by clicking one of the buttons on the bottom of this post.
Follow A Pinch of Joy so you don’t miss a thing! Click the buttons on the header to subscribe or follow so you can catch the latest post!
Linking up to these awesome parties here
Discover more from A Pinch of Joy
Subscribe to get the latest posts sent to your email.

 Welcome! I’m Charlene. I love to share quick and easy recipes, whatever I’ve learned in our last DIY project – anything that helps make life easier, better and more fun!! I hope you will find inspiration and add a pinch of joy to your day!
Beth @ Wiccan Make Some Too says
Thanks for this post! So helpful as I have some really funky wallpaper I NEED to remove from my kitchen.
Linda says
well this post is certainly timely as I have wallpaper removal and painting to do…thanks!
Linda
Charlene says
Hope this helps. A newly redone room is so fresh and that makes it
so worth the effort!