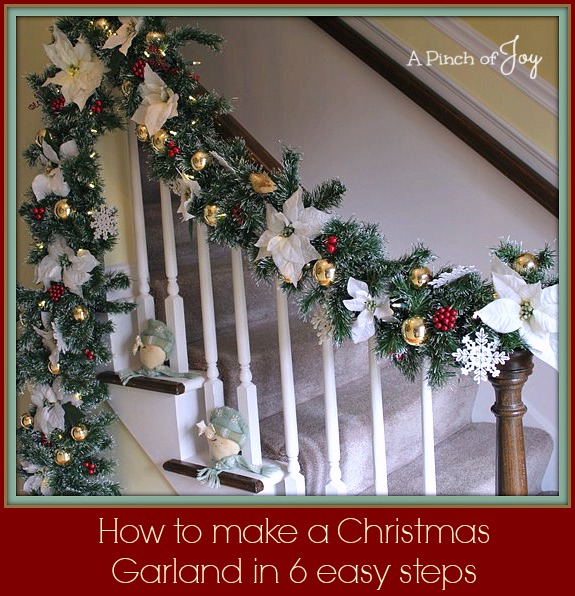
Garlands are so versatile for Christmas decorating! They can lay across a flat surface, like a mantel, hang from a railing, swoop around door frames, window or mirrors — and more. The best part is: Garlands don’t have to be disassembled for storage. Next year, open the storage container and there is a glorious ready made decoration just waiting to bring you cheer!
Step 1 — Choose the foundation
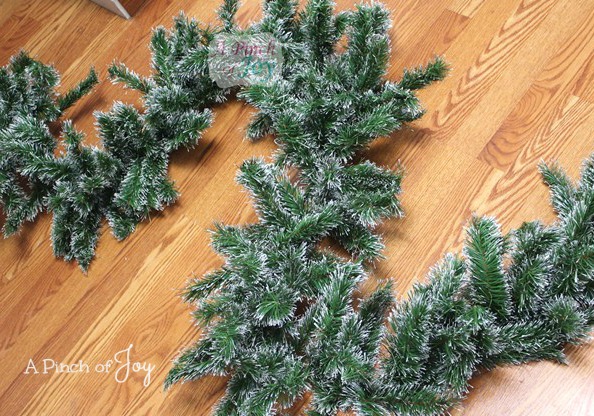
Choose size and type of garland you want. This one is eight foot long, quite full and is frosted. If your garland is not prelit, and you want lights, work the string of lights into the branches. Make sure the plug in will end up on the correct end for where you plan to use the garland! Put most of the lights in toward the center of the garland and just a few on the tips.
Step 2 — Create a Framework

Select three colors and three design elements.
- The largest sized design element will be the dominant element so what ever color you choose for it will also be the dominant color. When you are finished adding items of that size and color, they should be visible in 60 per cent of the garland. In our example, the dominant element is poinsettias and the dominant color is white. I counted the white from the frosted greenery as part of the 60% because it shows up more in real life than in the photos.
- The second choice will be the – surprise — secondary color and element. Round Christmas balls are an easy element choice. They “go with” any theme and come in an array of colors and sizes. The individual pieces of this element are smaller than the dominant pieces – the mama bear of our triad. Visually this choice will make up about 25 – 30 percent of the finished project.
- And the third color will be the accent – the one that makes the others pop! It will be about 15-20 percent of the color visible in the finished garland – not counting the background green. The element pieces will be the smallest in size of the three types of elements.
Step 3 – Preparation

Gather all your materials in one spot. (I like to work standing up at a counter.) Snip all stems, remove hangers from glass bulbs, get rid of price tags. You can do these things as you go along, but it is faster to do them assembly line style.
Step 4 – Measure

Divide garland into fifths. (You may want to do this on the floor so you have plenty of room.) For an eight foot garland, one fifth is 19 inches. Place one of your dominant elements at each of these points.
Step 5 – Create

Here is where your creativity can take over! Working with just one segment, begin to lay out, the different elements. Place them all over the width of the garland – not just in a straight line down the middle. Work first with the dominant color. Repeat the dominant element in the segment as you like, in uneven numbers counting the “marker” placed in step 4 on your left. Because this color forms 60% of the finished product, you can add a smaller second element in your dominant color to create interest.
The key is to keep them all the same color and tone. The example uses white snowflake as a lacy contrast to the solid looking poinsettia. Or use different sizes of the element – add small poinsettias in between the larger ones, for example. Place the dominant elements so they relate to one another visually– your eye moves easily from one to the other. From there, you decide when enough is enough!
Drop in the secondary element and color, so that it is about half of the visual“amount” in the segment as the dominant color. Again you can vary things as sizes, finishes (matte or shiny), clusters instead of singles. In general, use only one variation in order to avoid a cluttered look – especially if you used variations in the dominant color. The accent color can also vary, but less so than the other two colors. If you repeat one accent at regular intervals, adding a random variation is more pleasing to the eye. If you want your accent to fall only at random, it’s better to stick to just one element with no variation.
Step 6 – Assemble

When you have achieved a look that you like in one segment, use a hot glue gun to fasten each element to the garland. Be sure to use a low temp glue gun. High temp means just that – up to 400 degrees! I learned “first hand” (pun intended) how it can temporarily remove a fingerprint! Low temp is uncomfortable on the skin, but can be peeled off without burning and, in sufficient quantity, provides all the holding power necessary.
Keep fluffing the garland as you go along, so it doesn’t become flattened and one dimensional as you add the design elements.
Loosely repeat the pattern you developed in each of the four remaining segments. You don’t have to measure – just eyeball. This gives a feeling of movement and freedom in the finished garland. Then add one or two totally different elements in pleasing color, shape and proportion to the garland — just to break all the rules! You can alter the basic look from time to time by tucking in ribbon, strings of beads, feathers, mesh, or other things. Just keep in mind the 60 % proportion for the dominant color. For example, use wide red ribbon to loop around, through and below the garland, so red becomes the dominant color and white becomes the secondary color.
How to Make a Christmas Garland in Six Easy Steps Free Printable
Finished – at night

I’m so glad you stopped by today! Be sure to follow A Pinch of Joy so you don’t miss a thing!
Subscribe by email on the sidebar or follow on Facebook, RSS feed, bloglovin’ twitter and check out my pinterest boards. If you found this helpful or inspiring please share below! Your support of A Pinch of Joy is appreciated!
[amazon box=”B097P96G79″]
Discover more from A Pinch of Joy
Subscribe to get the latest posts sent to your email.

 Welcome! I’m Charlene. I love to share quick and easy recipes, whatever I’ve learned in our last DIY project – anything that helps make life easier, better and more fun!! I hope you will find inspiration and add a pinch of joy to your day!
Tammy Killough says
How how awesome. That is just too perfect! I’m so glad you shared this with us on Twirl and Take a Bow. I sure hope you’ll join us again this Tuesday! ~Tammy
Tammy Killough recently posted…Visions of Sugar What? Peanut Butter Pleasure Cookies
Bonnie @ The Pin Junkie says
Your banister looks beautiful! Thanks for sharing this project at The Pin Junkie. It was featured in today’s Christmas decorating roundup. http://www.thepinjunkie.com/2013/12/christmas-decorating-ideas.html Hope you can stop by and grab a featured button and be sure to share your best Christmas crafts at tonight’s party for another chance to be featured.
Bonnie @ The Pin Junkie recently posted…Christmas Decorating Ideas
Lizy says
Love it Charlene, I made one last year and I think my fingers were bleeding for about a week lol after attaching ornaments and all! yours looks absolutely beautiful, great tutorial!
Lizy recently posted…Tropical Pork Steaks Recipe