Do you ever wonder about the ideas that change our life? Who was the first person to put rice in a fabric container and how did they come up with the idea to heat it? Who found that the same rice bag placed in a freezer would become cold enough to provide therapeutic value? Did they start out with those goals in mind? Or was it some happy accident? However it happened, I am certainly glad it did! I have half a dozen different types of rice bags that I rotate all winter long. Great for warming cold toes, taking the chill off the bed, keeping warm company while reading, soothing aches. (I did mention that I am cold blooded and live where the winters are cold!) Bytes friend even uses one to warm her car seat while she scrapes the windshield!
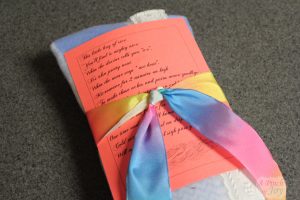
When my sister came home from the hospital following surgery, a new gifty rice bag was waiting for her. The one pictured above, in fact! Both ice for therapy and keeping warm while inactive were on her agenda. She needed to cover a large area of her petite self. She also needed a way to keep the “load” balanced so the heat or cold was even as well as the weight of the bag. And I wanted her to have a fleece cover that could be washed easily and that would help maintain the temperature, hot or cold.
Make your own extra large rice bag with cover – for gifting or for yourself!
You will need:
1. Tightly woven fabric – about 18 inches by 11. A fat quarter, used by quilters, is ideal. It comes in a rainbow of color and patterns. The dimensions are 18” x 22” so you can get two extra large rice bags from each quarter.
2. Rice – buy the cheapest. I used two pounds of rice to make the extra large bag. The amount needed will vary, depending on how tightly you fill the bags.
3. Optional cover: Fleece remnant about 9 inches by 25 inches and, if desired, trim about 10 inches long.
To make rice bag:
1. Fold fabric in half, matching right side to right side.
2. Beginning at fold, stitch one long edge, turn the corner and stitch across the end, using 5/8 inch seam allowance.
3. Snip corners on a diagonal to remove excess fabric.
4. Turn so right side of fabric is out and the seams are inside. Use point of scissors, if necessary to push corners out so they are square.
5.Next create channels to hold the rice in place. Hold bag with the open edge on top and fold in half. Mark fold with pins or chalk.
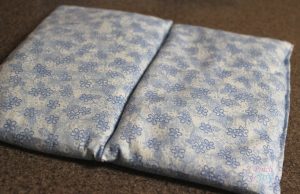
6. Begin at the closed edge of the bag, backstitching to lock thread, and stitch along marks. STOP two inched from open edge and backstitch. (Yes, the picture does show the channel stitching running parallel to the open edge. But follow the written directions and make the stitching at right angles to the open edge. I came up with this technique for later versions and the way the instructions are written works much better. I left the picture because it shows how the rice is contained and controlled by the stitching.)
7. Trim all loose threads, press if needed. This gives a more polished look and makes the bag easier to handle for finishing. But – ahem—skip it if your iron hasn’t seen the light of day for months or is nonexistent.
8. Fill each channel between one half and two thirds full, using the opening. If it is difficult to get the rice to go where you want, create a funnel by rolling a piece of paper into an open ended cone and putting the small end into the rice bag.
9. This is the tricky part! Keep rice bag on the table for this. You can either lay it flat or stand it on the closed end. Some bags work best one way; others work better the other. Tuck edges into the opening the width of the seam allowance which is 5/8 inch, taking care to keep the folded over fabric even. Pin as you go, spacing pins fairly close together to keep rice in the bag. Then stitch to close opening – I don’t have any happy tips to offer, except do the best you can to keep the rice pushed back. Just go for it! Closing the opening by hand stitching is also an option, if you prefer.
To use as cold pack: Place rice bag in a tightly closed freezer bag and keep in freezer until needed. Rice bag will mold to the body providing cold to relieve inflammation and swelling. The bag will hold the cold for the twenty minutes often prescribed and, depending on its size, even longer.
To use as hot pack: Place in microwave and heat on high in 30 second intervals. BE CAREFUL NOT TO OVERHEAT! Two minutes in my microwave will let me comfortably place the rice bag on skin and provide effective heat. However, that may not be true for your microwave. Also, the time needed to heat the rice to a comfortable and effective temperature will vary according to the size of the rice bag. Experiment with your new rice bag and your specific microwave to find the optimum time necessary to provide you with comfortable heat. (I prefer placing my rice bags on a plate or paper towel to protect them from any food particles that may hide in the microwave. See Do Not Try This at Home.)
To make the cover shown at top of post:
1. Lay fleece with 9 inch width across bottom. Fold bottom up about 11 inches. Stitch both sides closed and turn so seams are inside. Press with your hand so cover lays flat.
2. Lay cover with opening at top. The remaining three inches will form the flap when folded at the end of the stitched edges.
3. The top side of the flap when folded is where the trim goes. Pin into place and then stitch down the middle for narrow trim or on both sides for wider trim.
4. Done! Since the fleece tends to cling to itself, I didn’t think this one needed a fastener. You can add one if you choose.
 I added the card with an “original” poem and tucked this into Vee’s package with the ruana I also made for her. If you’d like a copy of the poem – which you are welcome to change any way you choose! — Right Click here and choose “save link as”.
Here’s the Ultimate Guide on How to Make a Therapeutic Heat Pack in different sizes and styles. You can find three more versions of the rice bag. There are heart shaped hand warmers, a big wrap around your arm (or leg) version and a version with channels to keep the rice from bunching up in one spot. All rice bags can be zipped in a sealable plastic bag and kept in the freezer for cold therapy as well.
I’m so glad you stopped by today! Be sure to follow A Pinch of Joy so you don’t miss a thing! Subscribe by email on the sidebar or follow on Facebook / RSS feed / bloglovin’ / twitter and check out my pinterest boards. Share: If you found this helpful or inspiring please share! Your support of A Pinch of Joy is appreciated!
Linking up to these awesome parties here
Discover more from A Pinch of Joy
Subscribe to get the latest posts sent to your email.


 Welcome! I’m Charlene. I love to share quick and easy recipes, whatever I’ve learned in our last DIY project – anything that helps make life easier, better and more fun!! I hope you will find inspiration and add a pinch of joy to your day!
Shirley Lupton says
Can’t wait to get started on these. Thanks
Natasha says
what a fantastic idea!!!
Thanks for linking up to serenity Saturday. Hope you can join us again this week
http://www.serenityyou.blogspot.com
Natasha xx
Shiloh says
This is such a good idea. I keep forgetting you can put these in the freezer.
Thanks so much for stopping by Everyday Gameplan. I love that your mother made you read an etiquette book. 🙂